Adding Logos to Receipts |
Go Back to List of FAQs Previous Next |
Including a custom Logo Image File on Receipts, Repairs, Appraisals
If you want to include a logo on your sales receipts (or gift receipts, repairs, appraisals note that typically you want your logo design image file to include the logo graphics along with the business name, address and phone number.
Then you would turn off the feature where Shopkeeper prints your store name and address and phone in text.
That way the presentation of the store name, logo and address information will be more coherent than using a graphics logo file mixed with regular text for the store name and address and phone.
Save your logo file in the folder \VISUALJS\DATA\MAIN\CUSTOM on the data drive where VJS data is stored.
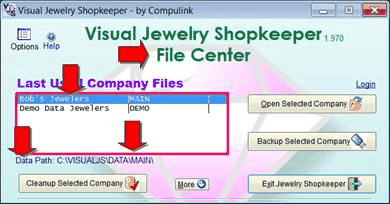
The \MAIN\ part of this folder path may be different for you. You can verify your data folder from the VJS File Center.
You can specify this logo file in "Preferences" via the Maintenance Menu, then choose Receipts, then the Half & 40 Col page , then click on the Browse button on the Receipt Logo File line.
A resolution of up to 300 dpi is sufficient. For example, a logo file up to 5" wide and 1" tall
I.e. 1" tall isn't a lot of space, so consider using the full width available rather than a tall stack of
Logo STORE NAME Logo Address Phone Address Email These should be centered in an image file of the width of one section of the receipt or repair ticket.
JPG or PNG are commonly used formats but GIF and TIF are fine if colors are simple.
If the design doesn't use all 5" of width keep the image that size leaving white space. This reduces the chance of unwanted stretching or squishing.
A logo for a roll-of-paper receipt printer should be approximately 572 pixels tall by 213 pixels high. However, if you want it to be significantly taller (to include more text or more designs) that can be accommodated with the use of a customized receipt layout in Shopkeeper.
If you also print repair tickets, you'll likely want a separate logo file with different dimensions. Ditto for appraisals.
Because your logo file will contain the address, you would also want to UN-check the option,
You would also want to UN-check the option "Print your store name on the Half-Page receipt."
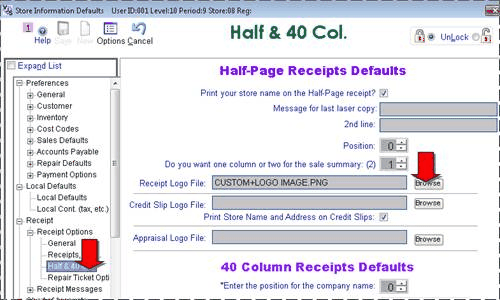
When you click on the Browse button, that will open the CUSTOM folder of your dataset. If your logo file is already there, you can double-click it to select it. If it 's not already there, you can simultaneously open (from Windows) the folder with your logo file and drag it into the CUSTOM folder. Use the right mouse button to drag so that when you drop it, you have the option to Copy it, as opposed to only Moving it.
(Because different computers on the network could refer to the shared network folder by a different letter or even a different "folder depth" the part of the folder path up to \CUSTOM will show as CUSTOM+ and will be interpreted at the time printing.)
- - - - - - - - - - - Appraisals:
There are various pre-made appraisal layouts and one of them is specifically expecting you to furnish an image file for the header, which you can choose that when you get to the Print Options dialog.
You'll want to create (or have your art person create) an image file of about 2178 pixels wide by 512 pixels tall. ( 7.26" x 1.71")
- - - - - - - - - - - Repairs:
Repair tickets often have a different shape and size than sales receipts so you can create a logo image file with different dimensions and specify the right logo file for repairs on the Repair Ticket Options screen of Preferences.
For example, a logo file to print at 2.9" wide and 1" tall could be about 870 pixels wide by 300 pixels tall. JPG and PNG are commonly used formats.
|